
There is a certain pride in being handy. In the landscaping, pest control, and agricultural industries, the “fix-it” mentality is practically a job requirement. You are used to improvising in the field, using zip ties, duct tape, and ingenuity to get the job done before the sun goes down. However, there is a fine line between being resourceful and being stubborn.
We all know the guy who has spent three days trying to rebuild a pump that was manufactured in 1998. He thinks he is saving money, but he’s actually bleeding profit. Between the cost of the parts, the hours of labor, and the downtime of the truck sitting in the shop, he could have bought a brand-new unit and been back on the road making money two days ago.
Knowing when to hold ’em and when to fold ’em is a critical business skill. While high-quality spray equipment is built to be durable and serviceable, nothing lasts forever. There are specific components where “repairing” is just a temporary bandage on a terminal wound.
Here is a guide to the parts you should stop trying to resurrect and simply replace.
1. The Cracked Poly Tank
This is the most dangerous item to repair. Polyethylene tanks are incredibly tough, but they have a mortal enemy: the sun. Over years of exposure to UV radiation, the plastic eventually becomes brittle. It loses its flexibility. When this happens, you might start to see spider-web cracks forming, usually near the mounting straps or the bulkheads.
The temptation is to get out the plastic welder or the epoxy. You might think, “I’ll just patch this little crack and get another season out of it.” Don’t do it.
A patch on a UV-damaged tank is a ticking time bomb. The structural integrity of the plastic is gone. The vibration of the truck and the sloshing of the liquid will inevitably cause that crack to spread—often rapidly and catastrophically.
Imagine a 200-gallon tank splitting open in a client’s driveway. You are looking at an environmental cleanup bill, a destroyed reputation, and potentially a lawsuit. If a tank shows signs of structural cracking or “crazing” (lots of tiny surface cracks), the safety risk far outweighs the cost of a new tank.
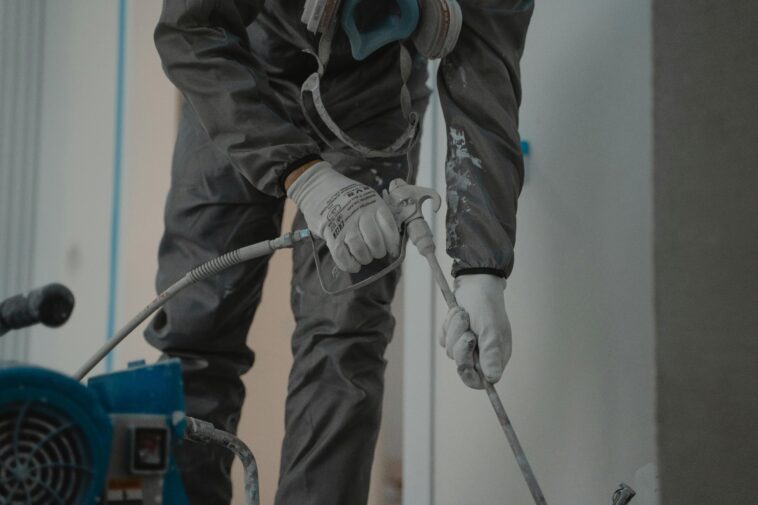
2. Nozzles
Spray tips are the most misunderstood component on the entire rig. Many operators treat them as permanent fixtures, only changing them if they physically break or get hopelessly clogged. But nozzles are consumables. They are like the tires on your truck; they wear down simply by doing their job.
As abrasive chemicals and fertilizers rush through the orifice at high pressure, they slowly sand away the plastic, brass, or stainless steel. The hole gets bigger. The shape of the hole changes. You cannot “repair” a worn nozzle. You can’t put material back.
If you try to clean a clogged nozzle with a piece of wire or a pocket knife, you will ruin it. You have scratched the orifice, which destroys the spray pattern. A worn nozzle might be putting out 15% or 20% more chemical than it is rated for. That means you are wasting 20% of your chemical budget every single time you pull the trigger. Compared to the cost of wasted herbicide, a new set of tips is pocket change. Stop trying to clean them out with paperclips—just toss them and snap in new ones.
3. High-Pressure Hoses with “A Few Too Many” Splices
We have all done it. You snag the hose on a fence post, or it rubs against a hot muffler, and it bursts. You cut out the bad section, insert a hose mender (splice), clamp it down, and keep spraying.
One splice is fine. Maybe two. But if your 300-foot hose looks like a Frankenstein monster with five or six brass menders along the length, it is time to retire it.
Why? Two reasons:
- Friction and Flow: Every splice introduces turbulence and restriction in the line. It drops your pressure at the gun.
- The Reel Nightmare: Splices get caught in the hose reel guides. They snag on roots. They scrape against customers’ flower pots. They make winding the hose back up a frustrating, physical battle for your technician.
Furthermore, hoses degrade from the inside out due to chemical exposure. If you are getting frequent bursts, the inner lining is likely shot. Fixing one burst just means the next one is waiting for you tomorrow. Replace the whole spool and sleep more soundly.
4. Pumps with Cracked Housings
Pumps are designed to be rebuilt. You should absolutely be changing diaphragms, valves, and o-rings on a schedule. That is standard maintenance. However, there is a “point of no return” for pumps, and it usually involves the metal housing.
If you have a pump that froze over the winter because it wasn’t winterized properly, you might find a hairline crack in the casting. Or, if you are using corrosive chemicals, the metal might be pitted and eroded to the point where the seals won’t seat properly anymore. You cannot weld a cast-iron or aluminum pump housing reliably, and it will almost always leak under pressure.
Additionally, apply the “50% Rule.” Price out the parts needed for a rebuild (pistons, connecting rods, bearings, seals). Then estimate your labor time. If the cost to fix it is more than 50% of the cost of a brand-new pump, buy the new pump. You get a warranty, you get factory-fresh performance, and you get zero headaches.
5. Electronic Controllers and Solenoids
Electronics and saltwater (or liquid fertilizer) do not mix. If you have an electric ball valve or a rate controller that is acting glitchy, it is often due to corrosion on the circuit board or inside the sealed motor housing.
You can try to clean the contacts. You can check the fuses. But if the internal board is corroded, trying to solder it or bypass it is usually a waste of time. These components are sealed for a reason. Once moisture gets inside, the “ghosts” in the machine will never truly leave.
An intermittent electrical failure is the most frustrating thing to troubleshoot in the field. It works in the shop, but fails when you hit a bump. Save your sanity. If an electronic component has suffered water damage or severe corrosion, replace the unit.
Thrifty vs. Cheap
There is a difference between being “thrifty” and being “cheap.” Being thrifty means maintaining your gear so it lasts a long time. Being cheap means trying to force a piece of equipment to work when it is clearly dead, risking your safety and your profitability in the process.
Your equipment makes you money. If it isn’t working, you aren’t earning. Sometimes, the most profitable thing you can do is open your wallet, buy the replacement part, and get back to work with a rig that runs like new.